Install Root CA
- Build new stand-alone root CA, not attached to domain and give unique name.
- Log on to the server as the administrator and install Certificate Services to create a stand-alone root certification authority.
- Install Certificate Authority service only, IIS is not needed.
- Create a new private key
- Ensure the common name for the CA is unique.
- Change the validity period for the CA’s certificate to 20 years
Install Sub CA
- Build new enterprise subordinate CA and add to domain.
Add the following role services- Certification Authority
- Certification Authority Web Enrollment
- Online Responder
- Certificate Enrollment Policy Web Service (Might need to install this later)
- Setup type is Enterprise, Subordinate CA, create a new key, Cryptographic service provider (CSP): RSA#Microsoft software Key Storage Provider
Key length: 2048, Hash algorithm SHA1. Common name is the same netbios name as the original enterprise root CA if you are migrating from a stand alone CA, otherwise use a new name. Certificate Request: Save a certificate to file and manually send it later. Server Authentication Certificate: Choose and assign a certificate for SSL later. - Save the certificate request to file and manually send it later to a parent CA.
- Save this file to a shared location, it will be used later after other configurations need to be done.
- For the following few steps we will setup a CRL for the new offline Root CA and change the URL location of the certificate revocation list (CRL) distribution point to a location that is accessible to all users in you organization’s network while the Root CA is offline. It is necessary to do this because the offline root CA’s default CRL Distribution Points (CDPs) are not accessible to users on the network and, if they are left unchanged, certificate revocation checking will fail.
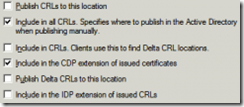
On the Root CA, Open Certification Authority - Right click on the RootCA server name -> Properties -> -> Extensions tab -> extension type: CRL Distribution Point (CDP):.
- Mark the line begins with “LDAP”, and click ‘Include in the CDP extension of issued certificates’.

- Mark the line begins with “HTTP”, and click remove.
- Mark the line begins with “file”, and click remove.
- Click on Add -> on the location, put: http://wwwca/CertEnroll/
.crl 
- Click on the line begins with “C:\Windows”, and make sure the only options checked are:

- Setup AIA information for the Offline Root CA, On the Extensions tab -> extension type: Authority Information Access (AIA):
- Mark the line begins with “LDAP”, and tick the following boxes

- Mark the line begins with “HTTP”, and click remove.
- Mark the line begins with “file”, and click remove.
- Click on Add -> on the location, put: http://wwwca/CertEnroll/
_ (wherewwwca is the netbios name of the Sub CA). Tick the following boxes..crt 
- Click OK and allow the CA server to restart its service
- Mark the line begins with “LDAP”, and tick the following boxes
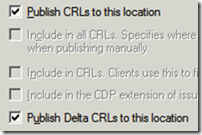
- From the “Certification Authority” left pane, right click on “Revoked certificates”-> Properties:
- CRL publication interval: 6 months
- Make sure “Publish Delta CRLs” is not checked
- Click OK
- Setup the root CA to issue certificates with an expiry date of 10 years (will issue to the Sub CA for 10 years)
- Change the following registry path on the Root CA -HKEY_LOCAL_MACHINE\SYSTEM\CurrentControlSet\services\CertSvc\Configuration\Root-CA\ValidityPeriodUnits
- Change the REG_DWORD decimal value to 10.
- This changes it to 10 years, so when the Sub CA gets a certificate, it won’t expire for another 10 years.
- Alternatively you can run from the command prompt – certutil -setreg CA\ValidityPeriodUnits 10 & certutil -setreg CA\ValidityPeriod "Years"
- Configure the offline root CA to support certificate revocation listing with Active Directory
- On the Root CA, Log on to the system as a Certification Authority Administrator.
- Open Command Prompt.
- Type the following, and then press ENTER. – certutil -setreg ca\DSConfigDN “CN=Configuration,DC=domain,DC=local”
- Type the following, and then press ENTER. – certutil -setreg ca\DSDomainDN “DC=domain,DC=local”
- Open Certification Authority.
- In the console tree, click the name of the certification authority (CA).
Where?- Certification Authority (Computer)/CA name
- On the Action menu, point to All Tasks, and click Stop Service to stop the service.
- On the Action menu, point to All Tasks, and click Start Service to start the service.
- From the “Certification Authority” left pane, right click on “Revoked certificates”-> All tasks -> Publish -> click OK
Manual steps to publish the Root CA CRL & AIA
- Copy the CRL & CRT file to the Sub CA
- On the Root CA, copy the files from C:\Windows\System32\CertSrv\CertEnroll to the same location on the Sub CA
- Publish the CRL & Root CA certificate to Active Directory
For this to work, you need to be a member of the Enterprise Admins group. Information is published to CN=Public Key Services,CN=Services,CN=Configuration,DC=C=domain,DC=local- From the Sub CA, the two files you copied before (.CRT and .CRL need to be used for this)
- Publish the Root certificate to AD - certutil -dspublish -f RootCACertificateFile.crt RootCA
- Publish the CRL information to Active Directory – certutil –dspublish -f CACRLFile.crl
- Add the Root CA to the AD trusted root area in Group Policy (Not really needed, up to you)
- On the DC, Start -> Administrative Tools -> Group Policy Management. From the left pane, expand the forest name -> expand Domains -> expand the relevant domain name -> right click on “Default domain policy” -> Edit. From the left pane, under “Computer Configuration” -> expand Policies -> expand “Windows Settings” -> expand “Security Settings” -> expand “Public Key Policies” -> right click on “Trusted Root Certification Authorities” -> Import -> click Next -> click Browse to locate the CRT file from the Root CA (C:\Windows\System32\CertSrv\CertEnroll) -> click Open -> click Next twice -> click Finish -> click OK.
- Issue the Sub CA a certificate from the Root CA server.
- Right click on the RootCA server name -> All Tasks -> Submit new request -> locate the subordinate CA request file (.req) -> Open.
- Expand the RootCA server name -> right click on “Pending Requests” -> locate the subordinate CA request ID according to the date -> right click on the request -> All Tasks -> Issue.
- From the left pane, click on “Issued Certificates” -> locate the subordinate CA request ID –> double click on the request –> Click the details TAB –> Copy to file –
.p7b -> click Save. - As an option only, on the SubCA, run the command bellow from command line to avoid offline CRL errors: Certutil.exe -setreg ca\CRLFlags +CRLF_REVCHECK_IGNORE_OFFLINE
- On the Sub CA, from command prompt, run – gpupdate/force
- Right click on the subordinate CA server name -> All Tasks -> “Install CA Certificate” -> locate the file
.p7b -> click Open. - Right click on the subordinate CA server name -> All Tasks -> Start Service.
- Start -> Administrative Tools -> Group Policy Management.
- From the left pane, expand the forest name -> expand Domains -> expand the relevant domain name -> right click on “Default domain policy” -> Edit.
- From the left pane, under “Computer Configuration” -> expand Policies -> expand “Windows Settings” -> expand “Security Settings” -> expand “Public Key Policies” -> right click on “Intermediate Certification Authorities” -> Import -> click Next -> click Browse to locate the CRT file from the subordinate CA server (C:\Windows\System32\certsrv\CertEnroll) -> click Open -> click Next twice -> click Finish -> click OK.
- Logoff the domain controller.
- By default, IIS 7.0 request filtering blocks the plus sign (+), which is used in the URL of delta CRLs. To allow delta CRL retrieval, modify the IIS configuration by setting allowDoubleEscaping=true on the requestFiltering element in the system.web section of IIS configuration. For more information about IIS 7.0 request filter configuration, see IIS 7.0: Configure Request Filters in IIS 7.0.
appcmd set config /section:requestfiltering /allowdoubleescaping:true Appcmd.exe can be found – %windir%\system32\inetsrv
Installing and configuring Online Responder (OCSP)
Testing CDP, AIA & OCSP information
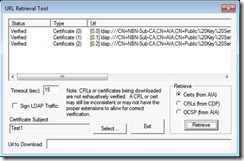
- To Test CRL & AIA on client certificates, export any client certificate to a .CER file. Run the following command against the .CER file –
certutil -url file.cer or certutil -url file.crl

Không có nhận xét nào:
Đăng nhận xét